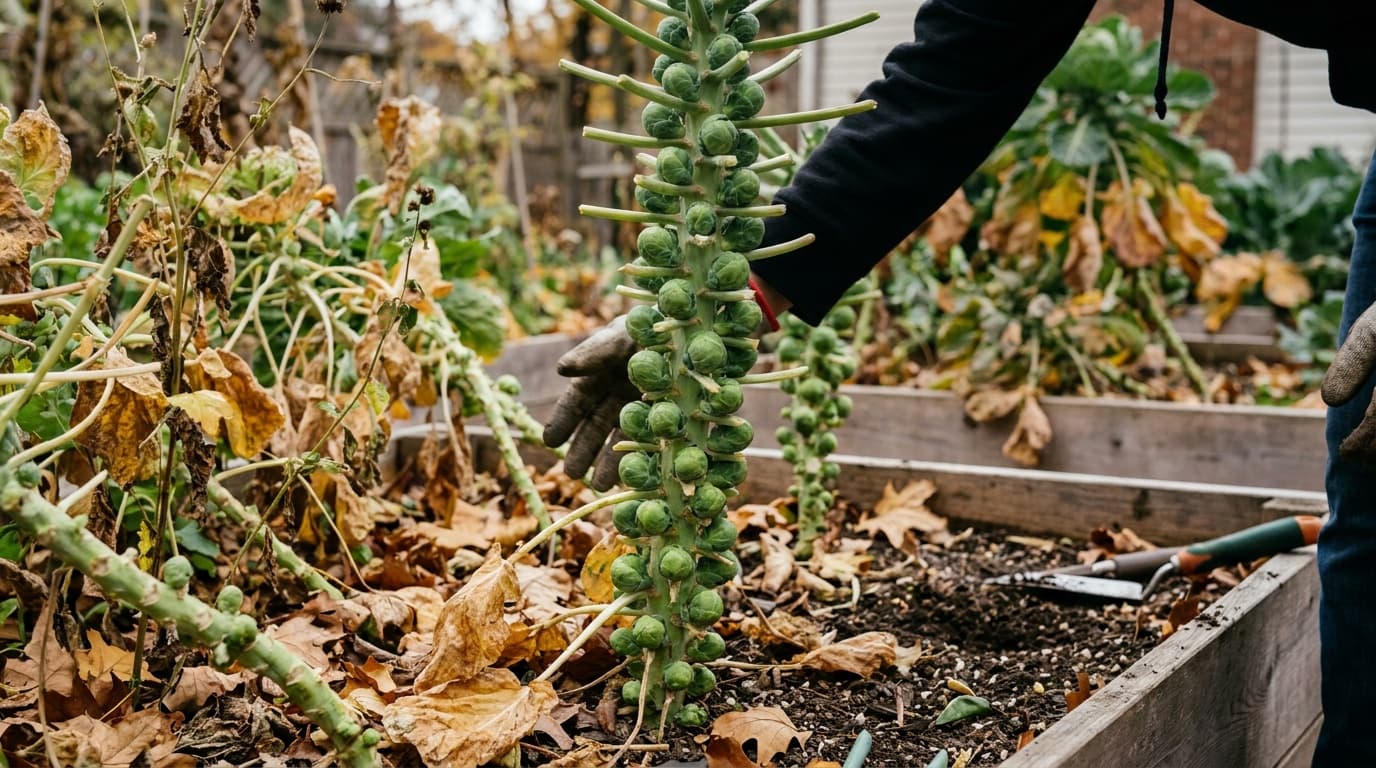
Brussels sprouts ask for patience, but their care is logical. The plant builds a tall column first, then forms buds at the leaf joints along that column. Lower buds enlarge before upper ones, so harvest naturally proceeds upward. Most disappointments come from a weak plant frame, interrupted growth, loose sprouts, or pests hidden among the leaf stalks.
Use the Brussels sprouts plant profile for exact local dates, bed layout, sowing depth, light and soil values, water rate, zone fit, and expected maturity. This guide covers the technique that turns a correctly placed crop into a productive one.
Build a stalk that can carry the crop
Choose a well-drained bed and work in finished compost before planting. Break compacted layers so roots can anchor a plant that will become top-heavy. Avoid sites where water lingers, because a tall plant with a compromised root system can wilt, lodge, or develop disease even when the foliage initially looks vigorous.
Move stocky, hardened transplants with their root plugs intact. Water the tray first, loosen only tightly circling roots, and firm the surrounding soil after planting. A temporary windbreak can help newly moved plants establish without rocking in the soil.
Brussels sprouts share soilborne problems with cabbage, broccoli, cauliflower, kale, collards, and turnips. Rotate the whole brassica family together using the home garden crop rotation guide. A new variety in the same old brassica bed is not a meaningful rotation.
Add support before the plant needs rescue
Install a sturdy stake while the plant is still upright and easy to handle. Place it beside the root zone without driving it through the main root mass. Tie the stalk loosely with a soft material that will not cut into expanding tissue. Add ties progressively as the plant rises rather than cinching the entire stalk at once.
Wind-rocked plants can tear fine roots even if the stalk never falls. After storms, check whether the base has opened a gap in the soil. Firm loose soil gently and adjust ties so the plant remains upright but can move slightly.
Protect leaves and developing buds
Floating row cover can exclude cabbage worms, loopers, flea beetles, and egg-laying flies while plants are young. Leave enough slack for growth, secure the edges, and inspect underneath during ordinary care.
Some links on this page are affiliate links. As an Amazon Associate I earn from qualifying purchases.
Brassica pest barrier
Agribon AG-19 Floating Row Cover
Best for: Gardeners who want cheap frost protection and pest exclusion in one fabric.
Keep in mind: Lightweight fabric tears and wears over seasons
Amazon price as of the checked date, subject to change. The price on Amazon at checkout applies.
Full research
- Weight
- 0.55 oz per sq yd
- Frost protection
- Down to roughly 28F
- Light transmission
- About 85%
- Material
- Spun-bonded polypropylene
A lightweight spun-bonded row cover that drapes over crops to add a few degrees of frost protection while still letting in light and water. It doubles as a physical barrier against many insect pests.
This catalog-wide research score is separate from this guide's use-case ranking. How we research
Strengths
- Extends the growing season at both ends
- Excludes many pests without chemicals
- Passes most light and water so it can stay on
Weaknesses
- Lightweight fabric tears and wears over seasons
- Needs hoops or pins to stay put in wind
Sprout Score breakdown
Best for
Gardeners who want cheap frost protection and pest exclusion in one fabric.
As plants outgrow the cover, continue inspecting leaf undersides and the joints where sprouts form. Caterpillars can hide against the stalk, and aphids can settle inside developing sprouts. Remove small colonies early with a firm water spray directed away from the plant center. For chewing damage, identify the pest with the imported cabbage worm or cabbage looper guide.
Keep useful leaves attached. Remove only leaves that are yellow, badly damaged, diseased, or blocking access to harvest-ready sprouts. Stripping a healthy stalk too early removes the plant's energy source and exposes developing buds.
Keep growth even and upright
Check the root zone regularly and irrigate before plants swing from drought stress to saturation. Direct water to the soil and let excess drain. Mulch can buffer moisture changes and reduce weeds, but keep the stem base open to inspection.
Judge fertility by the entire canopy. Even color and steady leaf production indicate the plant is functioning. Broad paling with healthy roots may call for a modest balanced side-dressing. A weak stalk, wilt in wet soil, or distorted roots requires diagnosis instead of fertilizer.
Loose sprouts may reflect warm growing conditions, uneven growth, an unsuitable variety, or stress to the plant. Keep care steady and harvest any firm buds that develop. The profile helps confirm variety and local crop fit; heavy late feeding does not reliably tighten loose sprouts.
Decide whether to top
Topping means removing the active growing point at the top of the stalk so the plant directs more energy into sprouts already present below. It is useful only after lower sprouts have begun to size and the stalk has built a healthy canopy.
Pinch or cut out the small central tip cleanly without stripping the upper leaves. Do not top a weak, recently damaged, or sparsely budded plant. Topping cannot create a crop that the stalk has not already initiated, and doing it too early sacrifices useful leaf and stem growth.
Harvest from the stalk upward
Begin with the lowest sprouts once they feel firm and compact. Twist each sprout downward or cut it close to the stalk without gouging neighboring buds. Remove the leaf directly below a harvested section if it is yellowing or obstructing access, then leave healthy upper foliage in place.
Move upward as successive sprouts firm. This staggered approach keeps smaller upper buds attached while they continue developing. If several sprouts become loose or damaged, harvest the usable ones promptly and trim them in the kitchen rather than waiting for the entire stalk to look uniform.
At the end of the crop, the tender top can also be harvested as a cooking green if it remains healthy. Remove diseased stalks and roots from the bed. Sound residue can be composted, but a plant showing clubroot or serious stem disease should not be recycled into the garden.
Troubleshoot stalk, leaf, and sprout together
Brussels sprouts field checks
Loose sprouts
Plant leans after wind
Aphids hide inside sprouts
Leaves are heavily chewed
Plant wilts in moist soil
Why are my Brussels sprouts loose instead of firm?
Loose buds can follow uneven growth, plant stress, variety mismatch, or unfavorable crop conditions. Keep roots evenly supplied, preserve healthy leaves, and harvest any sprouts that do firm. A late fertilizer surge is unlikely to correct the structure.
Should I remove Brussels sprout leaves?
Remove yellow, diseased, badly damaged, or obstructive lower leaves as harvest moves up the stalk. Keep healthy leaves because they supply the developing sprouts. Wholesale stripping can weaken the crop.
Does topping help Brussels sprouts?
It can help an established plant finish buds that are already forming. Remove only the active tip after the lower crop is developing well. Do not top a weak plant or use the technique before the stalk has built a strong canopy.
How should I harvest sprouts from the stalk?
Take firm lower sprouts first by twisting them downward or cutting close to the stalk. Work upward over successive harvests and leave smaller upper buds and healthy leaves in place to continue developing.
Brussels sprouts become manageable when the stalk is treated as a vertical sequence. Build and support the frame, preserve its leaves, finish the existing buds carefully, and harvest from the bottom upward.