Why save seeds at all
Seed saving closes the loop on a garden. You stop buying seed each year, you adapt varieties to your own conditions over time as you save from your best plants, and you preserve heirloom varieties that seed companies drop. It is also satisfying: a single tomato can hold enough seed to plant a whole neighborhood.
Start seed saving with crops that are easy to keep true to type. Some plants are almost foolproof, while others cross-pollinate readily or need two years to flower. Learn the basic process on the easier crops first.
The one rule before you start: open-pollinated only
Save seed only from open-pollinated or heirloom varieties. These breed true, meaning their seed grows into plants like the parent. Hybrid varieties, marked F1 on the packet, are crosses of two parent lines, and their seed produces an unpredictable mix that rarely resembles the plant you saved from. Check your seed packet or plant label before you bother saving.
Start with the four easiest crops
These crops self-pollinate, so their flowers fertilize themselves before they even open. That means they rarely cross with other varieties, and the seed comes true with almost no effort to keep it pure.
The beginner four
Beans and peas
Lettuce
Tomatoes
Three of these need nothing more than patience and a dry spot. Tomatoes add one extra step (fermenting), which is worth learning because it cleans the seed and reduces seed-borne disease.
Let seeds ripen, then dry them properly
The most common beginner mistake is harvesting seed too early. Seed must mature fully on the plant, which is almost always well past the stage you would eat the crop. Beans dry brown in the pod, lettuce goes to fluffy seed heads, and tomatoes must be dead ripe, even overripe.
From plant to stored seed
Wait for full maturity
Clean the seed
Dry thoroughly
Label everything
Labeling is the step people skip and regret. The variety and year written on the container is the whole value of saved seed; without it you have a jar of unknown seed by spring. Waterproof plant labels also carry through to next season, marking each row so you remember what you sowed where.
Some links on this page are affiliate links. As an Amazon Associate I earn from qualifying purchases.
HOMENOTE
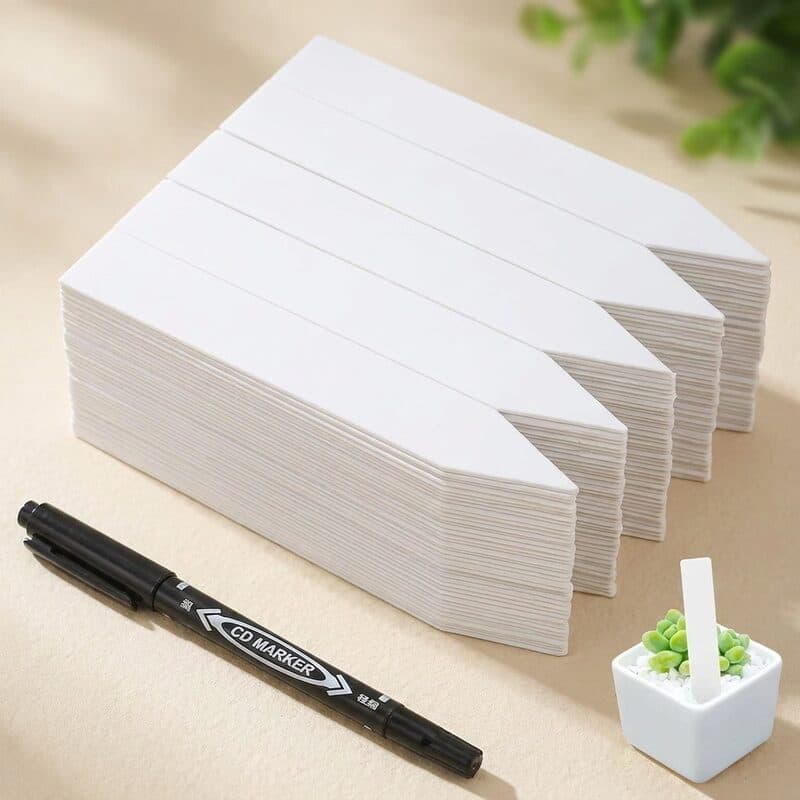
HOMENOTE Waterproof Plastic Plant Labels with Marker (4 in, 200-Pack)
Best for: Seed starters and bed gardeners who want a large, cheap supply of rain-resistant labels that stay legible from sowing through harvest.
Keep in mind: Thin tags can crack in hard freezes or snap if forced into compacted soil
Amazon price as of the checked date, subject to change. The price on Amazon at checkout applies.
Full research
- Quantity
- 200 labels + 1 marker pen
- Label size
- 3.94 x 0.7 in (4 in)
- Shape
- Pointed push-in tags
- Material
- Waterproof plastic
HOMENOTE's 200-piece pack of 4-inch waterproof plastic tags ships with a rain-resistant marker, giving seed starters a durable, multi-season labeling supply at a very low per-label cost.
This catalog-wide research score is separate from this guide's use-case ranking. How we research
Strengths
- Waterproof plastic will not rust, mold, or break down across multiple seasons
- Included marker resists rain wash-off and sun fade better than ordinary pens
- 200-count pack is enough to label an entire seed-starting operation cheaply
Weaknesses
- Thin tags can crack in hard freezes or snap if forced into compacted soil
- Plastic is not biodegradable, so end-of-life disposal is less tidy than wood
Sprout Score breakdown
Best for
Seed starters and bed gardeners who want a large, cheap supply of rain-resistant labels that stay legible from sowing through harvest.
Owner rating snapshot
Amazon · 22 reviews · 4.7 stars
Store seeds cool, dark, and dry
The enemies of stored seed are heat, light, and moisture. Get those three low and most vegetable seed stays viable for years.
Keep seed in paper envelopes or airtight jars in a cool, dark spot. A jar with a silica gel packet in a cupboard works well; the back of a refrigerator is even better for long-term storage, as long as the seed is fully dry first and the container is airtight so it does not pick up fridge moisture. Bean, pea, and tomato seed commonly stays good for 3 to 5 years stored this way, while lettuce is shorter-lived at around 2 to 3 years.
When you are ready for more
Once the easy four feel routine, you can move up to crops that need more care. Squash, cucumbers, and corn cross-pollinate freely, so you have to grow only one variety or hand-pollinate and isolate flowers to keep seed pure. Biennials like carrots, beets, and onions do not flower until their second year, so you must overwinter the plant before it sets seed, which our guide to extending your growing season can help with in colder zones.
When you plant your saved seed next year, time the sowings with the planting calendar for your ZIP, and check the relevant plant profiles like tomatoes and lettuce for spacing and timing.
What are the easiest seeds to save for beginners?
Beans, peas, lettuce, and tomatoes. All four self-pollinate, so their seed comes true with little effort to keep it pure. Beans and peas are the very simplest: just let the pods dry brown on the plant, then shell and store the seeds.
Can you save seeds from any vegetable?
You can save seed from any open-pollinated or heirloom variety. Avoid saving from hybrids (marked F1), because their seed does not grow true to the parent plant. Self-pollinating crops are easiest; cross-pollinating crops like squash and corn need isolation or hand-pollination to stay pure.
How do you dry seeds for storage?
Spread the seed in a single layer on a plate or screen, out of direct sun, and let it air-dry for one to two weeks. Seed is dry enough when it is hard and snaps or shatters rather than bending. Storing even slightly damp seed leads to mold and lost viability.
How long do saved seeds last?
It depends on the crop and storage. Stored cool, dark, dry, and airtight, bean, pea, tomato, and lettuce seed can remain viable for several years, with lettuce around five years under ideal conditions. Heat, light, and moisture shorten that significantly, so storage conditions matter as much as the crop.
Seed saving starts small. Pick beans, peas, lettuce, and tomatoes, let the seed ripen fully, dry it until it is truly hard, and store it cool and dark. Save from your best plants each year, and you will build a free, ever-improving seed supply that is suited to your own garden.